If you are interested in setting up your own ride and a little unsure of how to do it, here you go! We are going to walk you through the process of creating a ride, that when completed, will take about 60 seconds (or less)!
This might look like a lot, but actually, most of the available selections are optional. Once you create a ride, you will see how incredibly easy the process is. TL;DR version at the bottom.
Let’s go…
Note – While this post will focus on the mobile app – the process is the same on the website.
- Open the Chasing Watts app and get logged in.
- Click the Add button in the bottom menu bar.
- There are four screens in creating a ride, with most having optional selections.
1. Route Details
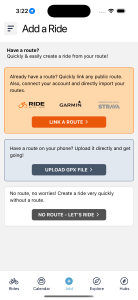
- To get started, you have three options when creating a ride:
- Link a public route url (Ride with GPS, Strava, or Garmin Connect).
- Upload a GPX file.
- No route.
If you’re a user of Ride with GPS or Strava, you have the option to connect your account with Chasing Watts. Once you authenticate your account (can be one or both if you choose), your routes will be immediately available when creating a ride. Only route information is used, we do not collect any profile or activity data. See how to connect your accounts here!
- For this example, we will link a route.
- All you need is the url of the route. It can be any public route from Ride with GPS, Strava, or Garmin Connect. Find a public route you like and copy the url to your clipboard. It will look like https://ridewithgps.com/routes/47763986 or https://www.strava.com/routes/3094009963044195774.
- To upload a GPX file, you need to have the file on your computer or phone.
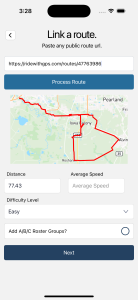
- Paste your url in the input and press “Process Route”.
- Your route will load and display on the map.
- If distance is available, that will be pulled in.
- Fill in the route details
- Distance – required
- Average Speed – required
- Difficulty Level – required
- Groups – optional
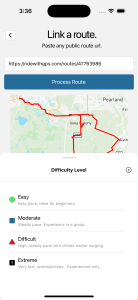
Difficulty Level
This is another way to give cyclists an indication of the intensity of your ride. There are four levels available:
- Easy – Easy pace, ideal for beginners.
- Moderate – Steady pace. Experience in a group.
- Difficult – High, steady pace with climbs and/or surging.
- Extreme – Very fast, sprints/climbs. Experienced only.
Groups
This option allows you to create roster groups – A, B, and C. If enabled, your roster will be separated by the three groups giving you the option to set different paces for your ride. As cyclists join your ride, they will be prompted to select which group they intend on riding. This will give a good indication of who is riding where and at what speed/pace.
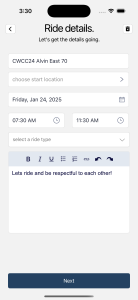
2. Ride Details
Here, you indicate the main details of your ride.
- Ride Name – required
- Start Location – required
- Type place name or address and select from suggestions.
- Start Date – required
- Start & End Time – required
- Ride Type – required
- Ride Notes – optional, but recommended
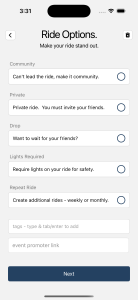
3. Ride Options
As the screen title indicates, here are optional selections to enhance your ride.
A few options to point out….
- Community – if you do not want to be directly associated with your ride as the leader. When enabled, the ride owner will be listed as “Community”.
- Private – if you set your ride as private, here are a few notes to be aware of:
- No ‘new ride’ notification is sent out.
- You must invite your friends or add your Hub members (if applicable).
- Take advantage of the ‘Private Share Link’. This is a specific code to your ride that you can share versus inviting friends.
- Repeat – you can repeat your ride weekly or monthly.
- Select the timeframe.
- Select the number to repeat.
Toggle or select options as needed. These options can be updated after the ride has been created if need be.
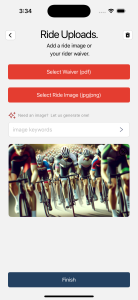
4. Ride Uploads
In the last screen, you have the option to add:
- Ride waiver (PDF file) specific to your ride. This will show the PDF below the roster join buttons.
- Image (png, jpg). This will override the map image in the main feed as well as show in the ride details.
- If you don’t have an image and would like one, the app can create one for you. Enter some keywords and go. If you don’t like an image, just re-generate.
- The keywords ‘cyclist with helmets’ and the ride distance are automatically added.
Finish!
Your ride has been created and is ready to go. From here, you can share, invite friends, or edit as needed!
TL;DR
Quickest (best?) way to create a ride:
- Link a public route from Ride with GPS, Strava, or Garmin.
- Just copy the link from one of your routes or from anyone’s for that matter. Just needs to be public.
- Enter the primary ride details and some notes.
- Select appropriate options like Community or Private OR don’t.
- Add an image/waiver OR don’t.
- Create, share, and sit back and think about how great your ride is going to be!
If you are a visual learner, here is a great video on how to create a ride in the mobile app:
LET’S RIDE.
If you have any questions or issues, please reach out to hello@chasingwatts.com.
Last updated: Jan 23, 2025